Winegrowers Supplies
- Penetrometer - instructions for use
This Penetrometer was developed with the cooperation and advice of the ISTITUTO di COLTIVAZIONI ARBOREE of the University of Milan.
A small and easy to use tool that is ideal for detecting the proper maturity at which to pick fruit, it can also be used later for measurement of fruit softening during cold storage.
It measures the pressure necessary to force a plunger of specified size into the pulp of the fruit. The pressure on the dial is shown in kilograms and in pounds.
The simple push-button operation and high accuracy of measurement make it one of the most practical and accurate fruit testers available anywhere.
Start measurements about fifteen days before normal picking time, then repeat at 5 day intervals for later-ripening apples, or 2 to 3 days for early-ripening apples or pears, and stone fruits.
Take random samples from several trees and several parts of each tree, as the result will be more representative of the whole.
A suitable sample will be 15 to 20 fruits. Two measurements need to be taken on each fruit at opposite sides, at the middle point of each side,
after removing a 12 to 19 mm diameter disc of peel.
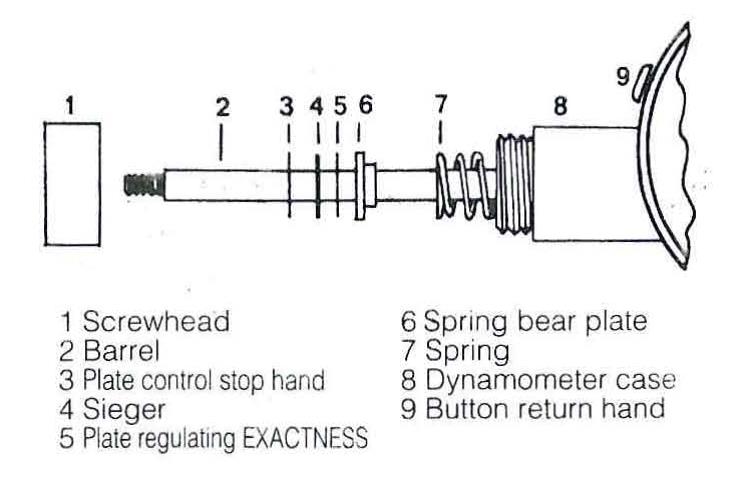
Hold the fruit firmly in the left hand; hold the fruit tester between thumb and forefinger of the right hand, push the 'button return hand' (9 in diagram below),
place the plunger against the fruit and press with increasing strength until the plunger tip has penetrated into the pulp up to the notch.
Slow penetration of the plunger is essential. Sharp movements and sudden pressure application may impair the measurement.
In order to assure slow penetration of the plunger, make sure that the hand holding the fruit is firm, leaning it on a table or firm surface, and keep your arm rigid.
In the pamphlet supplied with the Penetrometer some pressure values are given for the best picking stage of apples, pears and stone fruits.
After use, clean the Barrel (2 in diagram below).
If too much juice has entered into the barrel, it's best to remove the screw-head 1 and wash the parts 1-2-3-4-5-6-7 in the diagram below.
Then dry and put back together.